Programming a harmonic oscillator in HTML & JavaScript
Please use a newer browser to see the simulation.
Mass
Spring constant
In this tutorial we will program a simulation of a harmonic oscillator shown above using HTML and JavaScript. All you will need is a text editor and a web browser. No prior knowledge of programming or physics is required. Feel free to skip those physics parts that you are not familiar with, they are not necessary for doing this job. The resulting code can be embedded into any web page.
Contents
- What is a harmonic oscillator?
- Drawing a box-spring model with HTML canvas
- Equation of motion for the harmonic oscillator
- Solving the equation of motion numerically with Euler’s method
- Starting the simulation
- Adding user input for the mass and the spring constant
1. What is a harmonic oscillator?
A harmonic oscillator is a system frequently used in physics to describe various processes. This system has a rest position called equilibrium. If we move the system in any direction from the equilibrium there is force that pushes it back. The further away we displace the system the stronger is the force in the opposite direction. Or if we use the math language the force is opposite and proportional to the displacement x:
 (1)
(1)
We can imagine a simple model for the harmonic oscillator consisting of a box that is attached to the ground with a spring. The k value in Equation 1 is the spring constant which describes the stiffness of the spring. The larger the k value the harder it is to stretch or compress the spring.
To make things simple let’s assume we are living in an ideal world with no friction. Therefore, if we move the box and let it go it will keep wiggling back and forth forever.
2. Drawing a box-spring model with HTML canvas
Let’s begin writing our program by drawing the model consisting of a box and a spring. In later chapters we will animate this drawing according to the equation of motion of a harmonic oscillator.
2.1 Hello from HTML
First, we will create an HTML file with a test message and open it in the web browser.
- Create a new text file using a text editor of your choice.
- Write “Hello World!” in that file and save it to a local folder.
- Name the file harmonic.html
- Open the file in any web browser and you will see a page containing “Hello World!” message. On most operating systems you can open a local html file by just double-clicking it in your file manager. Alternatively, you can open it from your web browser’s File > Open menu.
Hello World!
2.2 View page source
You probably noticed the “Demo” buttons located under the code blocks.
- Click this demo button.
The button opens a web page showing the progress we’ve made up to this point. It can be also used to see the full source code we have written so far by using the View Page Source function of the web browser. In many desktop web browsers you can view the source by right clicking on the web page and selecting View Page Source option.
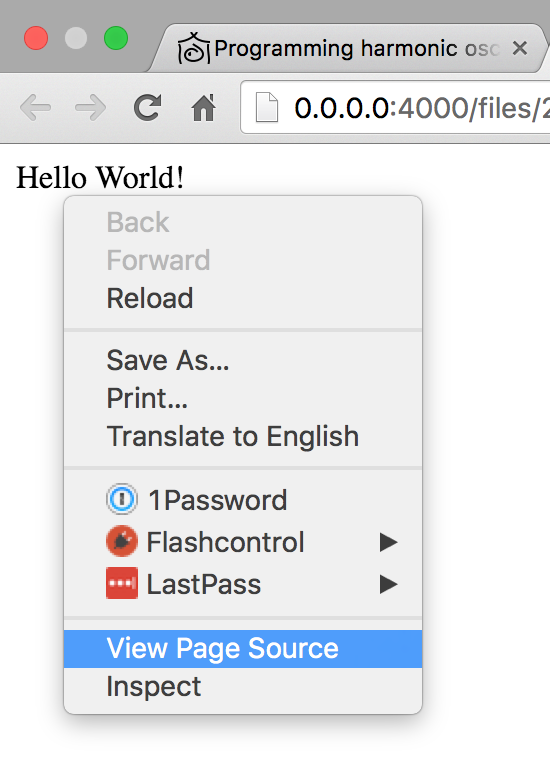
- View the source code of the last demo page, it should look like this:

If you can not see the “View Page Source” menu option, try doing the right-click on a different place of the web page.
If something goes wrong with your code, you can always view the source from the demo and copy it to your HTML file.
2.3 Canvas element
Now we will create an HTML canvas element. As you might have guessed from its name, this element is used for drawing.
- Replace “Hello World!” text in your HTML file with the following HTML code:
<div class="HarmonicOscillator">
  <canvas class="HarmonicOscillator-canvas"></canvas>
</div>
View the file in a web browser and it will show a blank page. This is expected because we have not drawn anything in the canvas yet. Do not worry if you do not understand the code, you will get familiar with it with a little bit of practice.
2.4 Old browser alert
Some old web browsers do not support the drawing with HTML canvas. If this is the case we need notify the user.
- Add the following HTML code in the beginning of your file.
<style>
  .HarmonicOscillator-alert {
    color: red;
    border: 1px solid red;
    background: #ffeeee;
    padding: 5px;
  }
</style>

<p id="HarmonicOscillator-notSupportedMessage" class="HarmonicOscillator-alert">Please use a newer browser to see the simulation.</p>
This will show an alert message “Please use a newer browser to see the simulation.” on top of the page. We will later hide this message in browsers that support canvas drawing.
As you probably noticed the code also includes styles for the alert message. This language is called CSS (Cascading Style Sheets).
2.5 Hello from JavaScript
We will write our first JavaScript code by showing a “Hello World!” message and later extend it to draw the box and the spring.
- Put this text at the end of your HTML file and you will see the ‘Hello from JavaScript!’ greeting in the web browser along with the alert message.
<script>

(function(){

  document.write('Hello from JavaScript!');

  // This is a comment. Here we will write JavaScript that draws the simulation.

})();

</script>
2.6 Graphics module
Now we will add a big chunk of code responsible for drawing of the simulation. This code is organized into a JavaScript module named graphics.
- Replace the
document.write('Hello from JavaScript!');line with the following code.
// Draw the scene
var graphics = (function() {
  var canvas = null, // Canvas DOM element.
    context = null, // Canvas context for drawing.
    canvasHeight = 100,
    boxSize = 50,
    springInfo = {
      height: 30, // Height of the spring
      numberOfSegments: 12 // Number of segments in the spring.
    },
    colors = {
      shade30: "#a66000",
      shade40: "#ff6c00",
      shade50: "#ffb100"
    };

  // Return the middle X position of the box
  function boxMiddleX(position) {
    var boxSpaceWidth = canvas.width - boxSize;
    return boxSpaceWidth * (position + 1) / 2 + boxSize / 2;
  }

  // Draw spring from the box to the center. Position argument is the box position and varies from -1 to 1.
  // Value 0 corresponds to the central position, while -1 and 1 are the left and right respectively.
  function drawSpring(position) {
    var springEndX = boxMiddleX(position),
      springTopY = (canvasHeight - springInfo.height) / 2,
      springEndY = canvasHeight / 2,
      canvasMiddleX = canvas.width / 2,
      singleSegmentWidth = (canvasMiddleX - springEndX) / (springInfo.numberOfSegments - 1),
      springGoesUp = true;

    context.beginPath();
    context.lineWidth = 1;
    context.strokeStyle = colors.shade40;
    context.moveTo(springEndX, springEndY);

    for (var i = 0; i < springInfo.numberOfSegments; i++) {
      var currentSegmentWidth = singleSegmentWidth;
      if (i === 0 || i === springInfo.numberOfSegments - 1) { currentSegmentWidth /= 2; }

      springEndX += currentSegmentWidth;
      springEndY = springTopY;
      if (!springGoesUp) { springEndY += springInfo.height; }
      if (i === springInfo.numberOfSegments - 1) { springEndY = canvasHeight / 2; }

      context.lineTo(springEndX, springEndY);
      springGoesUp = !springGoesUp;
    }

    context.stroke();
  }

  // Draw a box at position. Position is a value from -1 to 1.
  // Value 0 corresponds to the central position, while -1 and 1 are the left and right respectively.
  function drawBox(position) {
    var boxTopY = Math.floor((canvasHeight - boxSize) / 2);
    var startX = boxMiddleX(position) - boxSize / 2;

    // Rectangle
    context.beginPath();
    context.fillStyle = colors.shade50;
    context.fillRect(startX, boxTopY, boxSize, boxSize);

    // Border around rectangle
    context.beginPath();
    context.lineWidth = 1;
    context.strokeStyle = colors.shade30;
    context.strokeRect(startX + 0.5, boxTopY + 0.5, boxSize - 1, boxSize - 1);
  }

  // Draw vertical line in the middle
  function drawMiddleLine() {
    var middleX = Math.floor(canvas.width / 2);

    context.beginPath();
    context.moveTo(middleX, 0);
    context.lineTo(middleX, canvas.height);
    context.lineWidth = 2;
    context.strokeStyle = colors.shade40;
    context.setLineDash([2,3]);
    context.stroke();
    context.setLineDash([1,0]);
  }

  // Clears everything and draws the whole scene: the line, spring and the box.
  function drawScene(position) {
    context.clearRect(0, 0, canvas.width, canvas.height);
    drawMiddleLine();
    drawSpring(position);
    drawBox(position);
  }

  function hideCanvasNotSupportedMessage() {
    document.getElementById("HarmonicOscillator-notSupportedMessage").style.display ='none';
  }

  // Resize canvas to will the width of container
  function fitToContainer(){
    canvas.style.width='100%';
    canvas.style.height= canvasHeight + 'px';
    canvas.width  = canvas.offsetWidth;
    canvas.height = canvas.offsetHeight;
  }

  // Create canvas for drawing and call success argument
  function init(success) {
    // Find the canvas HTML element
    canvas = document.querySelector(".HarmonicOscillator-canvas");

    // Check if the browser supports canvas drawing
    if (!(window.requestAnimationFrame && canvas && canvas.getContext)) { return; }

    // Get canvas context for drawing
    context = canvas.getContext("2d");
    if (!context) { return; } // Error, browser does not support canvas

    // If we got to this point it means the browser can draw
    // Hide the old browser message
    hideCanvasNotSupportedMessage();

    // Update the size of the canvas
    fitToContainer();

    // Execute success callback function
    success();
  }

  return {
    fitToContainer: fitToContainer,
    drawScene: drawScene,
    init: init
  };
})();

// Call init function
graphics.init(function(){});

// Draw scene
graphics.drawScene(1);
Can you see the box on your screen? Well done!
If you don’t see the box, try viewing the source of the demo page and copying it to your HTML. The box is not animated yet, we will do it in later chapters.
At the end of the JavaScript code you can find the following line:
graphics.drawScene(1);
This line calls the drawScene function supplying number 1. This asks the program to draw the box at the rightmost position on screen. If you change the 1 to 0 it will draw the box in the middle of the screen.
With -1 it will draw the box on the left.
Try changing it to an intermediate value between 0 and 1, like 0.4. Later we will write a simulation code that will be call this drawScene function with a position value between -1 and 1 as the box moves from left to right and back.
3. Equation of motion for the harmonic oscillator
As we already shown in the beginning, the force law for the harmonic oscillator is
We can use Newton’s F = ma formula to rewrite the force law

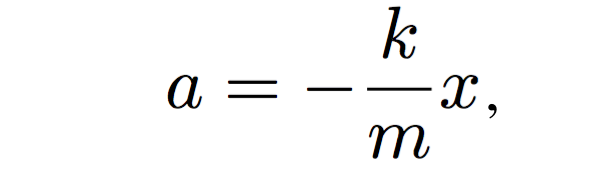 (2)
(2)
where x is the position of the box, m is its mass, k is the spring constant and a is the acceleration. In Equation 2 the acceleration a can be replaced with the second derivative of the position x to get the equation of motion for the harmonic oscillator
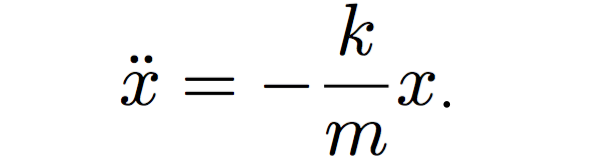 (3)
(3)
We will use a numerical method to solve Equation 3 and move the box in the simulation.
4. Solving the equation of motion numerically with Euler's method
Up to this point we have written the graphics module that draws the box and the spring of the harmonic oscillator.
Now we will add the physics module that calculates the position of the box as time goes by.
- Paste the following code above the graphics module (
var graphics = (function() {):
// Calculate position and velocity of the box
var physics = (function() {
  // Initial condition for the system
  var initialConditions = {
    position:       1.0, // Box is shown on the right initially
    velocity:       0.0, // Velocity is zero
    springConstant: 100.0, // The higher the value the stiffer the spring
    mass:           10.0 // The mass of the box
  };

  // Current state of the system
  var state = {
    /*
    Position of the box:
      0 is when the box is at the center.
      1.0 is the maximum position to the right.
      -1.0 is the maximum position to the left.
    */
    position: 0,
    velocity: 0,
    springConstant: 0, // The higher the value the stiffer the spring
    mass: 0 // The mass of the box
  };

  var deltaT = 0.016; // The length of the time increment, in seconds.

  function resetStateToInitialConditions() {
    state.position = initialConditions.position;
    state.velocity = initialConditions.velocity;
    state.springConstant = initialConditions.springConstant;
    state.mass = initialConditions.mass;
  }

  // Returns acceleration (change of velocity) for the given position
  function calculateAcceleration(x) {
    // We are using the equation of motion for the harmonic oscillator:
    // a = -(k/m) * x
    // Where a is acceleration, x is displacement, k is spring constant and m is mass.

    return -(state.springConstant / state.mass) * x;
  }

  // Calculates the new velocity: current velocity plus the change.
  function newVelocity(acceleration) {
    return state.velocity + deltaT * acceleration;
  }

  // Calculates the new position: current position plus the change.
  function newPosition() {
    return state.position + deltaT * state.velocity;
  }

  // The main function that is called on every animation frame.
  // It calculates and updates the current position of the box.
  function updatePosition() {
    var acceleration = calculateAcceleration(state.position);
    state.velocity = newVelocity(acceleration);
    state.position = newPosition();
    if (state.position > 1) { state.position = 1; }
    if (state.position < -1) { state.position = -1; }
  }

  return {
    resetStateToInitialConditions: resetStateToInitialConditions,
    updatePosition: updatePosition,
    initialConditions: initialConditions,
    state: state,
  };
})();
The demo page should look exactly like the previous one, with the motionless box. Here are the key parts of the physics code that we added.
The memory of the simulation
The program keeps the following information in memory.
-
The
initialConditionsobject contains the initial values for the velocity and position. We start the simulation by moving the box to the right and then let it go. Therefore, the initial position is 1 and the velocity is zero. -
The
stateobject keeps the current position and velocity as the system evolves through time. -
The
deltaTvariable stores the length of the time increment equal to 16 milliseconds. This tells the program by how much the time changes between frames. The value is used it to calculate the velocity and position of the box.
Updating box position
The central function of the physics module is updatePosition() which will be called 60 times per second. The function calculates and updates the current box position by using the Euler’s numerical method to solve the equation of motion (Equation 3). This is done in three steps:
a) Firstly, it determines the acceleration based on the current position.
var acceleration = calculateAcceleration(state.position);
b) Secondly, it calculates the new velocity based on the current acceleration:
state.velocity = newVelocity(acceleration);
c) And finally, it computes and updates the position of the box based on the current velocity:
state.position = newPosition();
Here is what we do in each of the three steps.
a) Calculating the acceleration
The current acceleration is calculated by the calculateAcceleration function. It uses the equation of motion we derived earlier (Equation 3).
// Returns acceleration (change of velocity) for the given position
function calculateAcceleration(x) {
  // We are using the equation of motion for the harmonic oscillator:
  // a = -(k/m) * x
  // Where a is acceleration, x is displacement, k is spring constant and m is mass.

  return -(state.springConstant / state.mass) * x;
}
b) Calculating the velocity
The velocity is calculated by the newVelocity function.
// Calculates the new velocity: current velocity plus the change.
function newVelocity(acceleration) {
  return state.velocity + deltaT * acceleration;
}
The new velocity is calculated by adding two values:
- the current velocity value and
- the change in velocity, which is deltaT times acceleration.

In our simulation the time increment deltaT is 16 milliseconds. We multiply it by the current acceleration to see by how much the velocity has changed since the last animation frame.
c) Calculating the position
The method of determining the position is very similar to the one we used for the velocity.
// Calculates the new position: current position plus the change.
function newPosition() {
  return state.position + deltaT * state.velocity;
}
The new position of the box is calculated by adding the current position and the change in position. The change in position is the length of time increment deltaT multiplied by the velocity.
5. Starting the simulation
We are finally ready to connect the graphics and physics modules together and start the simulation.
- Remove
graphics.init(function(){});line from the bottom part of the code. - Remove the next
graphics.drawScene(1);line. - Paste the following code instead of the two removed lines.
// Start the simulation
var simulation = (function() {
  // The method is called 60 times per second
  function animate() {
    physics.updatePosition();
    graphics.drawScene(physics.state.position);
    window.requestAnimationFrame(animate);
  }

  function start() {
    graphics.init(function() {
      // Use the initial conditions for the simulation
      physics.resetStateToInitialConditions();

      // Redraw the scene if page is resized
      window.addEventListener('resize', function(event){
        graphics.fitToContainer();
        graphics.drawScene(physics.state.position);
      });

      // Start the animation sequence
      animate();
    });
  }

  return {
    start: start
  };
})();

simulation.start();
Your page should now show the harmonic oscillator running recklessly from side to side. Fantastic!
The simulation module contains the animate() function which is executed 60 times per second. This function calculates the new position of the box and then draws the scene.
6. Adding user input for the mass and the spring constant
We are almost there. The final step is to add the ability for the user to tweak the mass and the spring constant.
Adding the text input controls
- At the beginning of the file, replace the entire
<style> ... </style>block with the following CSS code
<style>
  .HarmonicOscillator-alert {
    color: red;
    border: 1px solid red;
    background: #ffeeee;
    padding: 5px;
  }

  .HarmonicOscillator-input {
    font-family: inherit;
    font-size: 100%;
    margin: 0;
    padding: 10px 7px 7px 7px;
  }

  .HarmonicOscillator-inputSmall { width: 5em; }
  .HarmonicOscillator-isTextCentered { text-align: center; }
</style>
The code we just added contains the styles for the alert message and the text boxes.
- Add the following HTML code immediately after the element
<canvas class="HarmonicOscillator-canvas"></canvas>but before the closing</div>tag:
<p class="HarmonicOscillator-isTextCentered">Mass<br>
  <input class="HarmonicOscillator-input HarmonicOscillator-inputSmall HarmonicOscillator-isTextCentered" type="number" id="HarmonicOscillator-mass" min="1" max="10000" step="1" pattern="\d*">
</p>

<p class="HarmonicOscillator-isTextCentered">Spring constant<br>
  <input class="HarmonicOscillator-input HarmonicOscillator-inputSmall HarmonicOscillator-isTextCentered" type="number" id="HarmonicOscillator-springConstant" name="springConstant" min="1" max="10000" step="1" pattern="\d*">
</p>
You will see two empty text boxes centered under the harmonic oscillator. Next we will add the JavaScript code to connect these controls with the simulation.
Add the user input JavaScript
- Add the following code below the
simulation.start();line at the bottom part of the file:
// Get input for the mass and the spring constant from the user
var userInput = (function(){
  // Update mass and spring constant with selected values
  function updateSimulation(massInput, springConstantInput) {
    physics.resetStateToInitialConditions();
    physics.state.mass = parseFloat(massInput.value) || physics.initialConditions.mass;
    physics.state.springConstant = parseFloat(springConstantInput.value) || physics.initialConditions.springConstant;
  }

  function init() {
    // Mass
    // -----------

    var massInput = document.getElementById("HarmonicOscillator-mass");

    // Set initial mass value
    massInput.value = physics.initialConditions.mass;

    // User updates mass in simulation
    massInput.addEventListener('input', function() {
      updateSimulation(massInput, springConstantInput);
    });

    // Spring constant
    // -----------

    var springConstantInput = document.getElementById("HarmonicOscillator-springConstant");

    // Set initial spring constant value
    springConstantInput.value = physics.initialConditions.springConstant;

    // User updates spring constant in simulation
    springConstantInput.addEventListener('input', function() {
      updateSimulation(massInput, springConstantInput);
    });
  }

  return {
    init: init
  };
})();

userInput.init();
You will now be able to change the mass and the spring constant and update the simulation. That’s it, we are done!
Modeling the universe
We have learned how to create an HTML simulation of a physical process by using a numerical method of solving its equation of motion. It was convenient because we did not need to know the analytical solution to the equation, which may not even exist for more complex systems. This approach can be used to simulate all kinds of things from double pendulums to the motions of planets.
The simulation we created can be used on any web site. Fee free to leave a comment if you had any problems.
References
-
The complete source code of the harmonic oscillator simulation.
-
Susskind, L., & Hrabovsky, G. (2013). The theoretical minimum: What you need to know to start doing physics. New York: Basic Boks.
-
Euler’s method on Khan Academy.