Testing activity in Android Studio. Part 3.
This is the third and the final part of tutorial.
-
In the first part we learned how to create a new project, add a test configuration and run the tests.
-
In the second part we created our first test method
testGreet.
Now we will add some logic to out test and build the app in the process.
How we build the app
Before we start writing our first UI test I want to describe our development process.
- First, we write a test for a UI or logic that does not yet exist.
- We expect to see build errors or failed tests.
- Then we create a UI element or write program logic.
- Finally, we run the test and make sure it passes.
This workflow is sometimes called test-driven development. Which means writing tests before creating the actual program.
The Greeter app
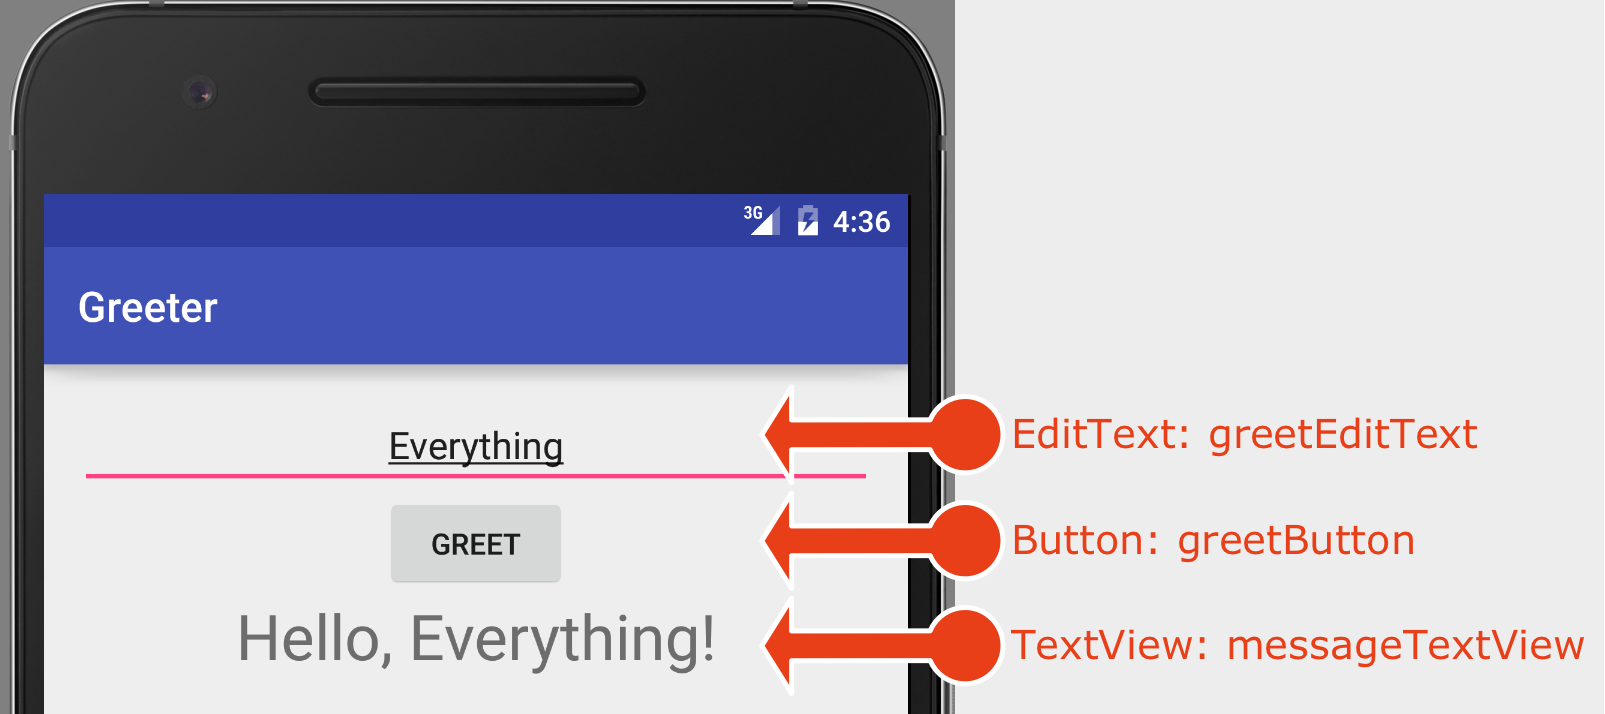
Just to remind us again, our app will have three components:
- An EditText where user enters a name.
- A “Greet” Button.
- And a TextView that will show the greeting message.
Each control on the screen will have a unique ID. Those IDs will be used in our tests to interact with the views. The IDs are: greetEditText, greetButton and messageTextView.
1. Enter a name into the EditText
We will start by extending the empty test method testGreet which we created earlier. The test will enter a name into the EditText control. Add this code into the testGreet method of the MainActivityTests class.
onView(withId(R.id.greetEditText))
    .perform(typeText("Jake"), closeSoftKeyboard());
You will also need to add these import statements to the top of the MainActivityTests file:
import static android.support.test.espresso.Espresso.onView;
import static android.support.test.espresso.action.ViewActions.closeSoftKeyboard;
import static android.support.test.espresso.action.ViewActions.typeText;
import static android.support.test.espresso.matcher.ViewMatchers.withId;
Your testGreet method will look like this.
@Test
public void testGreet() {
    onView(withId(R.id.greetEditText))
            .perform(typeText("Jake"), closeSoftKeyboard());
}
This test looks very compact but it is packed with action:
- First it finds a view with given ID
R.id.greetEditTextfor the text input. - Next it simulates a user tapping a text input and typing the text “Jake”.
- Finally it closes the keyboard.
Add EditText control to activity layout
You will notice an error for the greetEditText ID. That’s because the EditText does not exist yet in our app layout. Let’s create it.
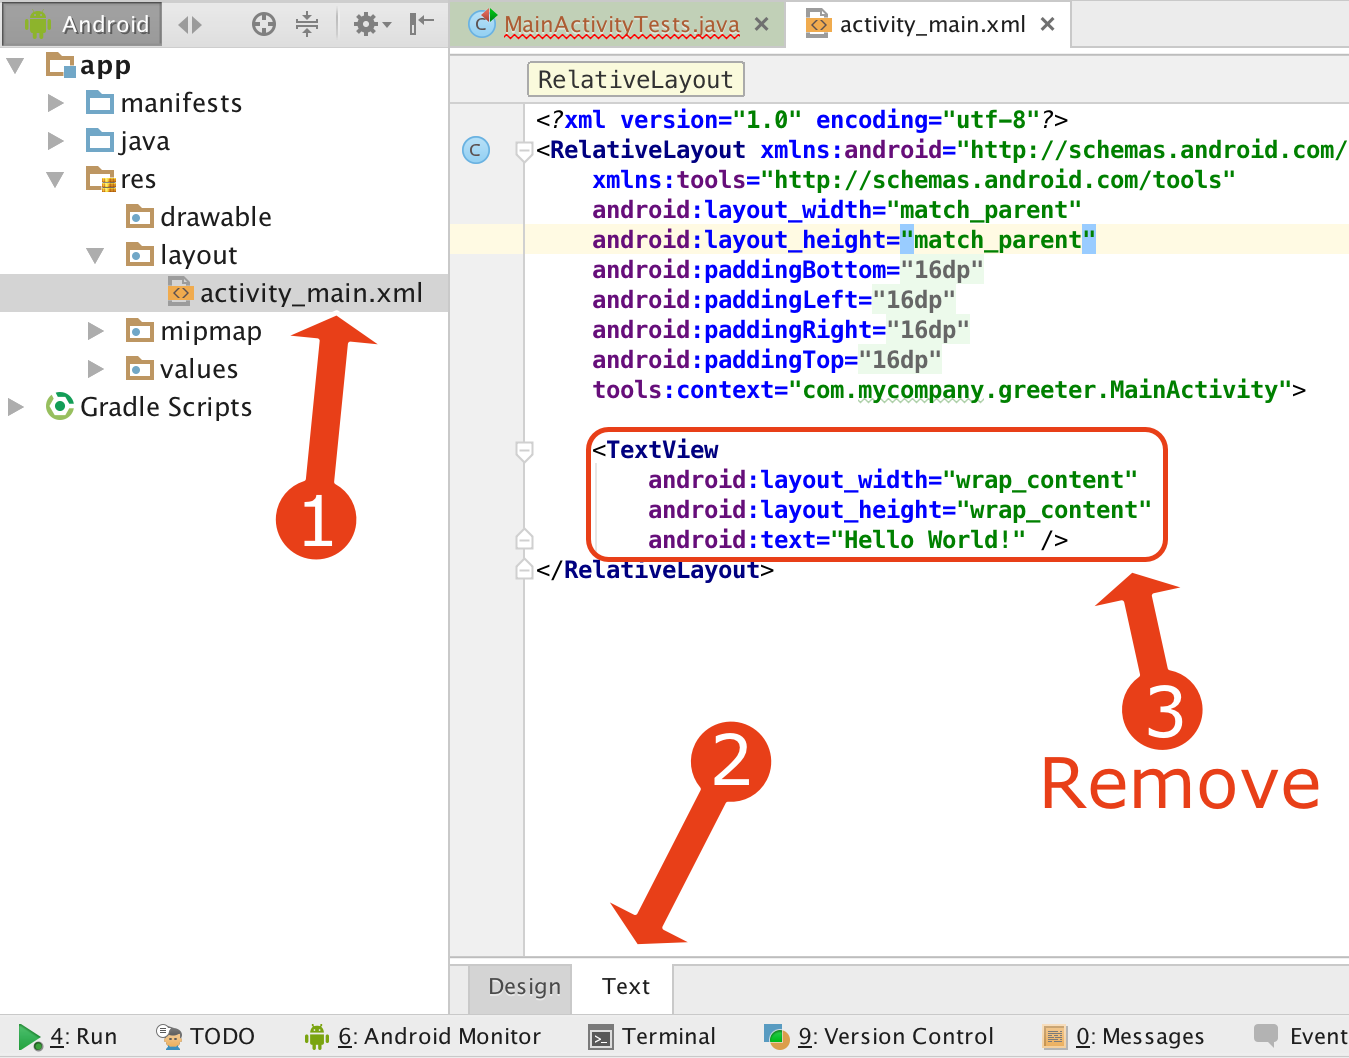
- Expand app > res > layout folder in the Project tool window and open activity_main.xml file.
- Switch main window from from Design to Text mode. You will see the XML markup for the layout.
- Remove automatically generated TextView element with “Hello world!” message.
- Add the following ExitText element between
RelativeLayoutopening and closing tags:
<EditText
    android:id="@+id/greetEditText"
    android:layout_width="match_parent"
    android:layout_height="wrap_content"
    android:gravity="center"
    android:inputType="textCapSentences"/>
Your activity_main.xml will look like this:
<?xml version="1.0" encoding="utf-8"?>
<RelativeLayout xmlns:android="http://schemas.android.com/apk/res/android"
    xmlns:tools="http://schemas.android.com/tools"
    android:layout_width="match_parent"
    android:layout_height="match_parent"
    android:paddingBottom="@dimen/activity_vertical_margin"
    android:paddingLeft="@dimen/activity_horizontal_margin"
    android:paddingRight="@dimen/activity_horizontal_margin"
    android:paddingTop="@dimen/activity_vertical_margin"
    tools:context="com.mycompany.greeter.MainActivity">

    <EditText
        android:id="@+id/greetEditText"
        android:layout_width="match_parent"
        android:layout_height="wrap_content"
        android:gravity="center"
        android:inputType="textCapSentences"/>

</RelativeLayout>
Run the test
You will notice that the error in your test file is fixed now. Run the tests and they will pass. You can run the test and watch in amazement while the simulator launches the app and types the text “Jake” into the text input. Isn’t it amazing?
2. Tap the “Greet” button
It is time to implement the “Greet” button. Let’s start with the test, as usual.
Add the following code to the end of testGreet method:
onView(withText("Greet")).perform(click());
This code does two things:
- Gets a view by its text “Greet”.
- Taps it.
Add the new imports to the top of the test file;
import static android.support.test.espresso.action.ViewActions.click;
import static android.support.test.espresso.matcher.ViewMatchers.withText;
This is the full code of testGreet method:
@Test
public void testGreet() {
    onView(withId(R.id.greetEditText))
            .perform(typeText("Jake"), closeSoftKeyboard());

    onView(withText("Greet")).perform(click());
}
Run the test and let it fail
If we run the tests now it will fail with the following error message:
android.support.test.espresso.NoMatchingViewException: No views in hierarchy found matching: with text: is “Greet”
As you probably already figured out, the test can not find the greet button because we have not created it yet. Let’s do that now.
Add a button to activity layout
Switch back to activity_main.xml file and add the following text after the EditText element:
<Button
    android:id="@+id/greetButton"
    android:text="@string/greetButton"
    android:layout_width="wrap_content"
    android:layout_height="wrap_content"
    android:layout_below="@+id/greetEditText"
    android:layout_centerHorizontal="true" />
The full layout code will be:
<?xml version="1.0" encoding="utf-8"?>
<RelativeLayout xmlns:android="http://schemas.android.com/apk/res/android"
    xmlns:tools="http://schemas.android.com/tools"
    android:layout_width="match_parent"
    android:layout_height="match_parent"
    android:paddingBottom="@dimen/activity_vertical_margin"
    android:paddingLeft="@dimen/activity_horizontal_margin"
    android:paddingRight="@dimen/activity_horizontal_margin"
    android:paddingTop="@dimen/activity_vertical_margin"
    tools:context="com.mycompany.greeter.MainActivity">

    <EditText
        android:id="@+id/greetEditText"
        android:layout_width="match_parent"
        android:layout_height="wrap_content"
        android:gravity="center"
        android:inputType="textCapSentences"/>

    <Button
        android:id="@+id/greetButton"
        android:text="@string/greetButton"
        android:layout_width="wrap_content"
        android:layout_height="wrap_content"
        android:layout_below="@+id/greetEditText"
        android:layout_centerHorizontal="true" />

</RelativeLayout>
Add button caption to string resources
You will notice that @string/greetButton attribute value looks red. This is the caption of the Greet button that is taken from the string resources and it is currently missing.
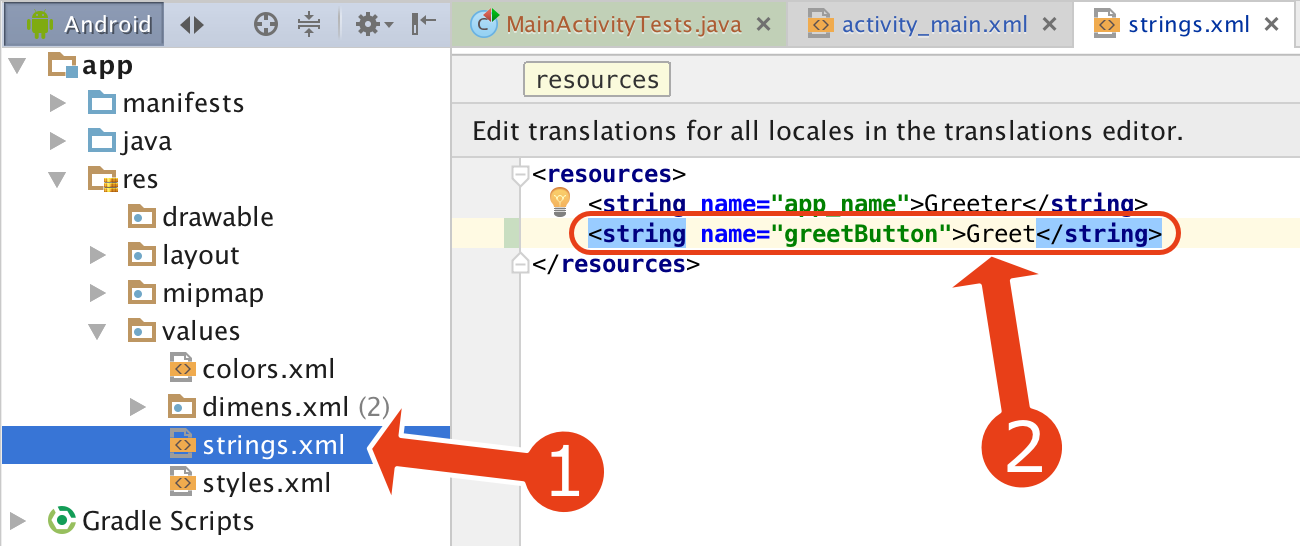
Add the button’s caption text to the string resource file:
- Expand app > res > values in project window.
- Open strings.xml file.
- Add the following element after the last string element and before the closing
</resources>tag.
<string name="greetButton">Greet</string>
The full contents of string.xml file will be the following:
<resources>
    <string name="app_name">Greeter</string>
    <string name="greetButton">Greet</string>
</resources>
Run tests
Run the tests and see them pass. Mathematical!
3. Verify the greeting message
We are almost there. When you ran the test you probably noticed how it entered the “Jake” text and tapped the “Greet” button. After the button is tapped our app is supposed to show the greeting message “Hello, Jake!”. But this is not happening yet.
We will now make it happen by first writing the test and then implementing this logic in the app code.
Switch to MainActivityTests and add this code to the end of testGreet method.
onView(withId(R.id.messageTextView))
                .check(matches(withText("Hello, Jake!")));
This code does the following:
- Finds a view by its ID
messageTextView. - Verifies the text of the view to be “Hello, Jake!”.
You will need to add a new import to the top of the test file:
import static android.support.test.espresso.assertion.ViewAssertions.matches;
The full testGreet method will be:
@Test
public void testGreet() {
    onView(withId(R.id.greetEditText))
            .perform(typeText("Jake"), closeSoftKeyboard());

    onView(withText("Greet")).perform(click());

    onView(withId(R.id.messageTextView))
            .check(matches(withText("Hello, Jake!")));
}
Everything should be fine, the only problem is that messageTextView ID is missing.
Add the greeting TextView
Switch to activity_main.xml and add the following text after the Button element:
<TextView
    android:id="@+id/messageTextView"
    android:layout_width="match_parent"
    android:layout_height="wrap_content"
    android:layout_below="@id/greetButton"
    android:gravity="center"
    android:textSize="30sp"/>
The full layout code will be:
<?xml version="1.0" encoding="utf-8"?>
<RelativeLayout xmlns:android="http://schemas.android.com/apk/res/android"
    xmlns:tools="http://schemas.android.com/tools"
    android:layout_width="match_parent"
    android:layout_height="match_parent"
    android:paddingBottom="@dimen/activity_vertical_margin"
    android:paddingLeft="@dimen/activity_horizontal_margin"
    android:paddingRight="@dimen/activity_horizontal_margin"
    android:paddingTop="@dimen/activity_vertical_margin"
    tools:context="com.mycompany.greeter.MainActivity">

    <EditText
        android:id="@+id/greetEditText"
        android:layout_width="match_parent"
        android:layout_height="wrap_content"
        android:gravity="center"
        android:inputType="textCapSentences"/>

    <Button
        android:id="@+id/greetButton"
        android:text="@string/greetButton"
        android:layout_width="wrap_content"
        android:layout_height="wrap_content"
        android:layout_below="@+id/greetEditText"
        android:layout_centerHorizontal="true" />

    <TextView
        android:id="@+id/messageTextView"
        android:layout_width="match_parent"
        android:layout_height="wrap_content"
        android:layout_below="@id/greetButton"
        android:gravity="center"
        android:textSize="30sp"/>

</RelativeLayout>
Run the tests and fail again
Run the test and notice how testGreet fails with a rather hairy error message:
android.support.test.espresso.base.DefaultFailureHandler$AssertionFailedWithCauseError: ‘with text: is “Hello, Jake!”’ doesn’t match the selected view.
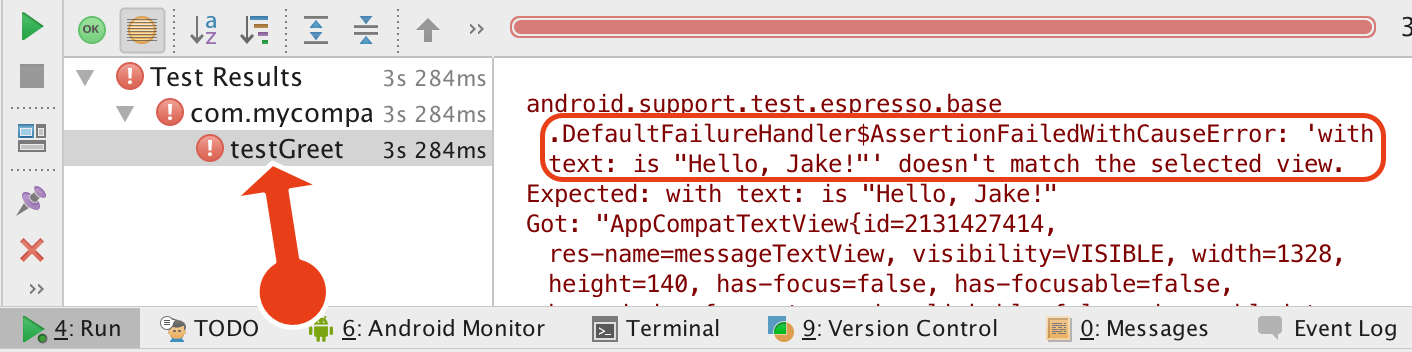
As you probably realized, the test failed because we have not implemented the output of the greeting message in the app yet. That message stays empty instead of showing the greeting text. Let’s fix it.
4. Greeting message logic implementation
There are two things left to be done. Let’s remind us again what the app does. When the user taps the “Greet” button, the app shows a greeting message. We now need to write code that is executed when the user taps the “Greet” button.
- Open activity_main.xml file.
- Add
android:onClick="didTapGreetButton"attribute to the Button element.
The button element will look like:
<Button
    android:id="@+id/greetButton"
    android:text="@string/greetButton"
    android:layout_width="wrap_content"
    android:layout_height="wrap_content"
    android:layout_below="@+id/greetEditText"
    android:layout_centerHorizontal="true"
    android:onClick="didTapGreetButton" />
The full layout code will be the following:
<?xml version="1.0" encoding="utf-8"?>
<RelativeLayout xmlns:android="http://schemas.android.com/apk/res/android"
    xmlns:tools="http://schemas.android.com/tools"
    android:layout_width="match_parent"
    android:layout_height="match_parent"
    android:paddingBottom="@dimen/activity_vertical_margin"
    android:paddingLeft="@dimen/activity_horizontal_margin"
    android:paddingRight="@dimen/activity_horizontal_margin"
    android:paddingTop="@dimen/activity_vertical_margin"
    tools:context="com.mycompany.greeter.MainActivity">

    <EditText
        android:id="@+id/greetEditText"
        android:layout_width="match_parent"
        android:layout_height="wrap_content"
        android:gravity="center"
        android:inputType="textCapSentences"/>

    <Button
        android:id="@+id/greetButton"
        android:text="@string/greetButton"
        android:layout_width="wrap_content"
        android:layout_height="wrap_content"
        android:layout_below="@+id/greetEditText"
        android:layout_centerHorizontal="true"
        android:onClick="didTapGreetButton" />

    <TextView
        android:id="@+id/messageTextView"
        android:layout_width="match_parent"
        android:layout_height="wrap_content"
        android:layout_below="@id/greetButton"
        android:gravity="center"
        android:textSize="30sp"/>

</RelativeLayout>
You will see that didTapGreetButton is highlighted and reports this error message:
Method ‘didTapGreetButton’ is missing in ‘MainActivity’ or has incorrect signature.
Now I find this unbelievable! We have a human-readable error message that actually makes sense! Let’s pause for a second to enjoy this rare convenience.
Implement didTapGreetButton method
We are at the finish line and will write the final piece of code. It will be the didTapGreetButton method that will show the greeting message.
- Expand app > java > com.mycompany.greeter module. Note that this time we are editing the app’s main module and not the test one.
- Open MainActivity class.
- Add the following method to it.
public void didTapGreetButton(View view) {
    EditText greetEditText =
            (EditText) findViewById(R.id.greetEditText);

    String name = greetEditText.getText().toString();
    String greeting = String.format("Hello, %s!", name);

    TextView messageTextView =
            (TextView) findViewById(R.id.messageTextView);

    messageTextView.setText(greeting);
}
This didTapGreetButton method does the following:
- First, it finds EditText element by ID
greetEditText. - Gets the text from the input.
- Next, it constructs the greeting message with the format “Hello, %s!”.
- Finds the TextView by its ID
messageTextView. - And finally, shows the greeting message in the text view by calling
setTextmethod.
Add these missing imports to the top of the MainActivity file.
import android.widget.EditText;
import android.widget.TextView;
import android.view.View;
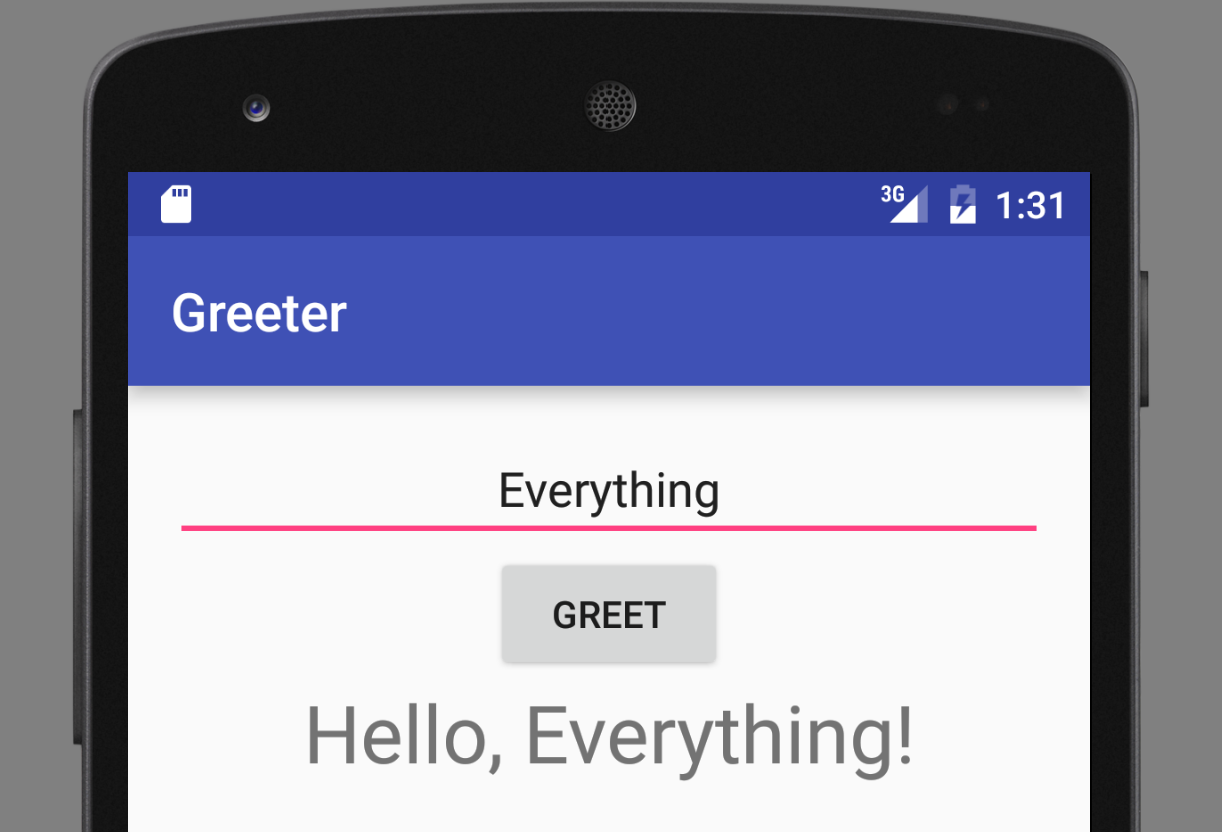
Run the tests and the app
If we run the tests they should all pass. Next, try running the app and see it working. Let’s tell the boss!
If anything went wrong, please refer to the sample Code for the Greeter app.
Miracles of programming
Now isn’t it amazing? I find it truly remarkable each time I run the app for the first time after doing test-driven development. The app grows naturally as if it’s just a by-product of our tests process.
Reference
- Part 1, Part 2 and Part 3 of this tutorial.
- Sample Code for the Greeter app
- Building Your First App - Android Developers